imported>Andri |
imported>Andri |
| Line 4: |
Line 4: |
| | | | |
| | == Creating the Project == | | == Creating the Project == |
| − | Launch AgentSheets and '''select '''[[New_Project|'''File->New Project...''']]''' to start a new AgentSheets project.''' After choosing the location and naming your project, '''choose the size of your agents.''' For the simulation we are creating, use 16x16 pixel agents so that when we experiment, we can build large forests (worksheets that can fit many tree agents). | + | Launch AgentCubes and create a new project (choose the location and name of your project). |
| | | | |
| | == Creating Agents == | | == Creating Agents == |
Revision as of 22:17, 23 June 2011
Introduction
The forest fire simulation built with this tutorial enables you to explore how forest fires unravel by letting you set fires to virtual forests with different tree densities. This simulation can them be used for data collection and analysis in math units.
Creating the Project
Launch AgentCubes and create a new project (choose the location and name of your project).
Creating Agents
The simulation has a Tree agent, a Ground agent, a Controller agent, and a Start Here agent.
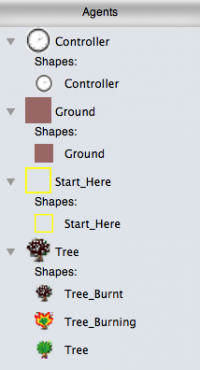 |
| The Tree agent has three depictions: |
|
File:Tree.gif a healthy tree
File:Tree burning.gif a burning tree for when the tree is on fire, and
File:Tree burnt.gif a burnt tree for then the fire completely goes out.
|
| File:Ground.gif The Ground agent has one depiction and generates forests of different densities |
| File:Controller.gifThe Controller agent is used (later on) to synchronize the fire and signal the ground to generate forests of different densities |
| File:Start here.gifThe Start Here agent is used (later on) as a visual clue during experimentation and data collection for students to start the fire at the same location every time they run an experiment |
|
Creating a Forest
If you haven't created a new worksheet, use File->New Worksheet to create one. Please note that later on we will be generating the forest automatically, but for now let's do this manually: Select your Ground agent in the Gallery and using the Draw Rectangle tool, lay out a layer of Ground agents in the background of your worksheet. Then select your healthy Tree agent and using the Pencil tool place a few on the Ground. Place one Burning_Tree, which will start the fire, somewhere in the middle of the worksheet to create a forest like the one shown below.
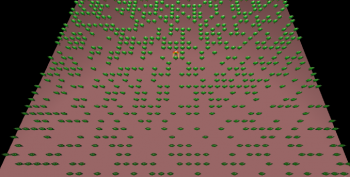
This is a good time to save the worksheet!
Programing the Tree
We need to program the Tree agent to catch on fire if it's next to a burning tree and burn completely when the fire dies out. Select the Tree agent in the Gallery and hit the Edit Behavior button. Create two rules for the tree:, one to start the fire if it's a healthy tree with a certain probability, and one to stop it when the fire dies out with a certain probability:
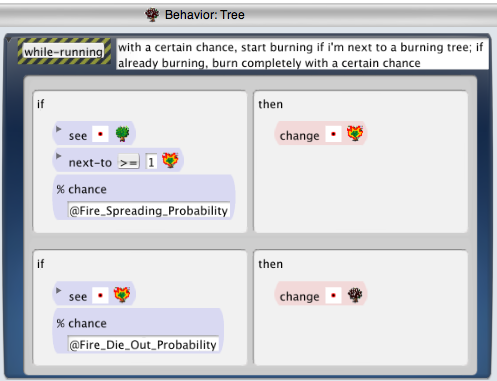 |
| If I am a healthy tree and I am next to a burning tree, with 80% chance, I will change into a burning tree myself |
| If I am a burning tree, with 50% chance i will turn into a completely burnt tree, to simulate the fire dying out (50% can turn into a "Die_Out_Probability" simulation property for future experimentation. |
|
Now try out your simulation by running it. Depending on the density of the forest you created, the fire spreads widely or dies out quickly.
But notice something: if you reset your worksheet to its original state and hit the Step button to run one cycle of the simulation you will get something like this:
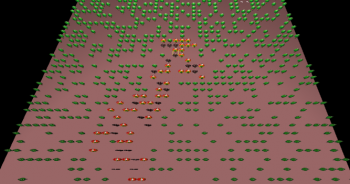 |
| What is wrong with this picture? You will notice that trees that are far away from the source (the initial burning tree) catch on fire in the very first step, which is not very realistic (especially given that we are not simulating wind). This happens because AgentSheets has an explicit order in with it executes the behaviors of the agents in the worksheet. The healthy trees that are in the execution list after the burning tree, will catch on fire (based on the probability) in the first step. If it happens that all the trees were placed on the list after the burning tree, all of them would catch on fire in the first step.
|
|
How can we fix this? We need to coordinate the behavior of the tree so that within the same simulation cycle, all the trees have a chance to determine if they should be burning first, and then actually perform the burning actions. For that, we can use a Controller agent to synchronize the tree behavior (make it parallel).
Programming the Controller to synchronize/parallelize tree burning
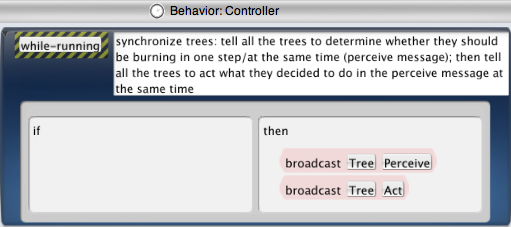 |
| To synchronize the actions of trees, the controller broadcasts to all trees a PERCEIVE message to determine if they are supposed to be burning, followed by an ACT message to actually start burning or have the fire die out.
|
|
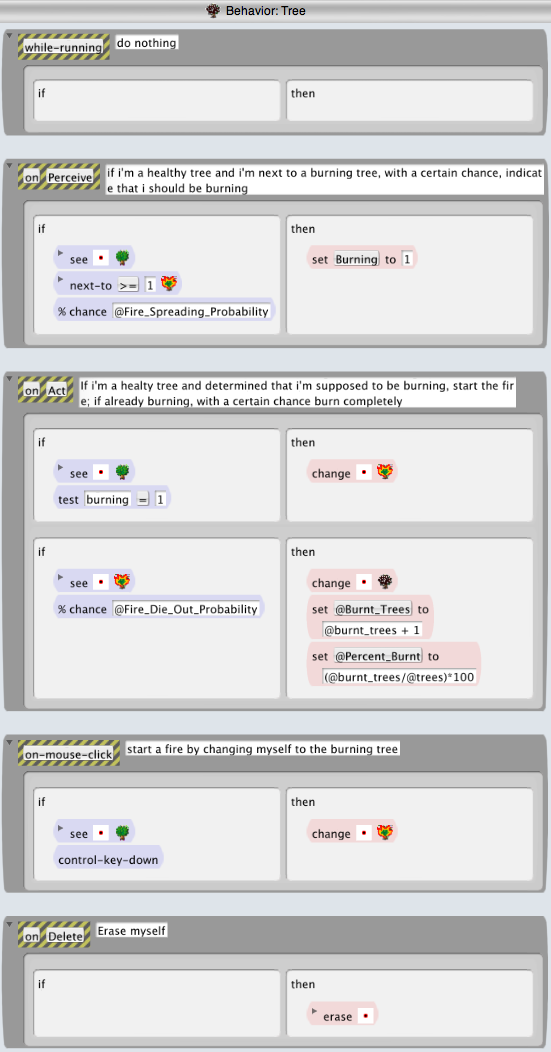 |
| The PERCEIVE method of the tree determines whether a healthy tree should start burning - it does so if the healthy tree is next to at least one burning tree, with a certain probability, 80% in this case. This fire spreading probability can eventually be made into a simulation property for use in experimentation, but for now we can keep it constant. Please note that the PERCEIVE method does not actually set the tree on fire by turning it into a burning tree, but sets a variable/flag to indicate that the tree should be burning. This way, all the trees get a chance to determine whether they should be burning in parallel, avoiding the issue encountered in the previous section.
|
| The ACT method of the tree actually carries out the burning: if the tree is healthy and its "burning" flag is set, it turns into the burning tree. Otherwise, if it's an already burning tree, with a certain probability, it turns into a burnt tree and increments the @burnt_trees counter (simulation property). The fire die out probability is 50% in this case, but it can be also turned into a simulation property later on for easier experimentation.
|
| Starting a fire: when the tree is clicked with the "Hand" tool on the worksheet, it turns into a burning tree. |
| The tree deletes itself when it receives the "delete" message. This will be used to regenerate forests of a certain density as described below. |
|
Now try running your simulation again. Stepping through your fire simulation should look like this:
<youtube v="bbAA5qWKX50"/>
Regenerating the forest with a certain density
| File:Controller behavior.png |
To regenerate the forest, we add a method to the Controller's behavior that is triggered with the "Hand" tool. When the controller is clicked with that tool in the worksheet, it broadcasts to all the current trees in the forest to delete themselves, resets the total number of trees (@trees simulation property) and the number of burnt trees (@burnt_trees) to 0 and sends a "create_forest" message to the ground to generate the new forest.
|
|
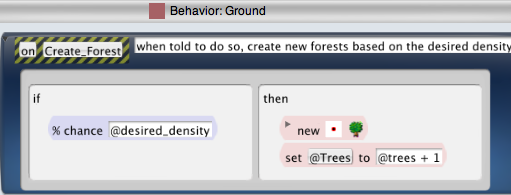 |
| When the ground receives the "create_forest" message, it creates a new healthy tree on the same square the ground resides and increments the total number of tress (@trees) by one. This happens with a certain probability, that determines the density of the forest (@desired_density). We will later be changing this simulation property to experiment with setting fires to forests of varying densities.
|
|
Simulation Properties
Running your simulation will create the simulation properties used without your explicitly creating them. But especially for the input properties (e.g. Desired_Density), it's good to create them yourself so you can initialize it to the values you want - otherwise, the simulation automatically creates them with 0 as the default value. Pull up the Simulation Properties editor, using Tools->Simulation Properties and add the following properties:
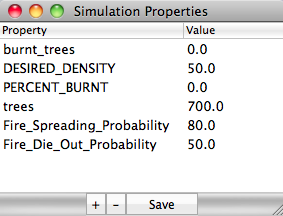 |
- Burnt_trees: the number of burnt trees (set to 0 initially)
- Trees: the total number of trees the forest has (set to some number other than 0 initially - the simulation will set it to the right number when you regenerate the forest and you should save your properties with that number)
- DESIRED_DENSITY: density your generated forests should have (set to 50% initially; this will change for experimentation)
- PERCENT_BURNT: percentage of trees that got burnt (set to 0 initially - the simulation will calculate this)
|
|
Once you have your properties set, make sure you hit the Save button to save them.
Please note that we capitalized the DESIRED_DENSITY and the PERCENT_BURNT to make it easier for users to tell which simulations properties they need to manipulate or look at for their experimentation.
Updating worksheet to include Controller and Start_Here agents
Add a controller agent and a Start_Here agent to your worksheet as shown below, save your worksheet, and you are ready to start data collection for the Sampling and Bivariate Data Analysis unit.
700px


